EazyCNC Plugin Writers' Guide
            Version: 0.2
          Published: ?.?.2015
             Author: Kustaa Nyholm
          Copyright: (C) 2015 Kustaa Nyholm / Siuntio Finland
            Contact: eazycnc@sparetimelabs.com
[toc]
Quick Links
Following links are listed here so that you will not have to search for them among the text.
Download EazyCNC Plugin Interface Javadoc
Introduction
Plugins are small pieces of program code that EazyCNC calls at specific times and situations to allow the extending or customising of the EazyCNC functionality.
This document is the 'straight dope', from programmer to programmer, not intended (though no disrespect) for the average CNC machinist who only wants to craft some G-code and cut metal.
While writing plugins is not that difficult, some experience with programming is necessary. If you are still only learning to program, writing plugins for a machine tool can seriously damage both your health and wealth, and therefore may not be a good idea.
Plugins are written in Java, so for their programming it is necessary to have a good grasp of basic Java programming. This manual does not contain Java tutorial material and therefore assumes a decent level of familiarity with Java.
This document describes the fundamentals of writing plugins with a number of examples. For details, please see the definitive reference EazyCNC Plugin Interface Javadoc.
Plugin writing for EazyCNC is still in its infancy, so API/ABI breakage as well as errors and omissions in documentation (not to mention implementation) are still the norm and should be expected. Rather than struggling with problems by themselves budding plugin authors urged contact join the mailing list at eazycnc@freelists.org or contact eazycnc@sparetimelabs.com for friendly advice.
First taste of Java plugins
Plugins can be distributed either as source code (as .java files) or pre-compiled (as .class or .jar files). If they are distributed as source code, EazyCNC will automatically compile them when it starts up and cache the compiled files.
To create a plugin, you need to place a .java file in a directory inside the plugins directory in the EazyCNC home directory.
When EazyCNC starts up, it searches the plugins directory as well as any subdirectories for plugin code and loads everything it finds.
To give you a taste of writing a plugin, here is a Hello World -plugin for EazyCNC.
// Needs to be in a file named HelloWordlPlugin.java
import com.eazycnc.plugin.*;

public class HelloWorldPlugin extends Plugin {
        public void onInit() {
            System.err.println("Hello World!");
        }
    }
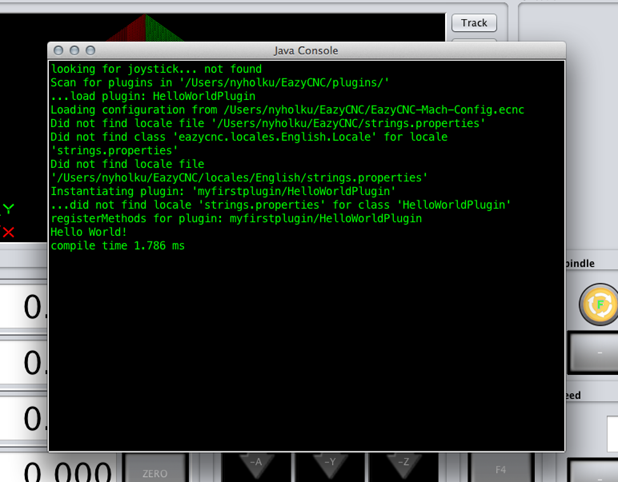
Place the above piece of code in a directory named helloworld inside the plugins directory. If everything goes as it should, when EazyCNC starts up you will see the text Hello World! (amid lots of other information) output to the Java console.
To bring up the Java console, hit the F12 function key on your keyboard.
You should now see something like (note the last but one line):
Setting up for Plugin Development
In its simplest form, all you need is a text editor.
Just take the 'Hello World' plugin code (above), place it in a directory inside the plugins directory under the EazyCNC home directory, fire up EazyCNC and Bob's your uncle!
More specifically, assuming your username is nyholku and that you are using Mac OS X, place the above code in a text file whose path is:
/Users/nyholku/EazyCNC/plugins/myfirstplugin/HelloWorldPlugin.java
It is important that the text file does not have the extension .txt but rather the extension .java.
Is is also required that the file name be the same as the class name that it defines; therefore if you rename the class, you need to rename the file as well (and vice versa).
Please also note that when you make changes to your plugin source code, you need to restart EazyCNC for the program to notice the changes and recompile the code so your changes take effect.
Any errors during compiling will be output to the Java console, so keep a keen eye on it!
But maybe you are not happy with a simple text editor and would rather want something with code completion and syntax colouring?
No problem, plenty of choice there. And while this is no Eclipse tutorial, here are a few tips that may help you set up Eclipse for EazyCNC plugin development.
Start by creating a directory for you plugin code (myfirstplugin above) and placing the HelloWorldPlugin.java file there.
Next, you need to create a new Java project. Select File/New/Java Project... and give your project a name. You can both use the default location for the project, in which case it'll be created in the current workspace, or place it somewhere else - but don't use the myfirstplugin directory as the location. Click Finish to create the project.
Next, you need to add the file EazyCNC-plugin-classes.jar to the build path of your project. To do that, right-click on the project name in the Package Explorer and select Build Path/Configure Build Path.... If the Package Explorer is not visible, bring it up from the Window/Show View menu.
Lastly, add the plugin source code to your project. Right-click on the src directory under the project name and select File/New File from the menu. In the dialogue that appears, click Advanced>>, tick the Link to file in the file system, then click on the Browse... button and browse to the plugin java source file, click Open and then Finish. (Things get a little bit more complicated if you want to place your classes into anything but the default Java package[^4].)
[^4]: If you want to place your classes in some other package than the Java default package, say com.example then you need to create the package/directory structure both in Eclipse and in the root directory of your plugin. So in Eclipse you need to select File/New/Package and create com.example. Then in the your plugin's directory you need to create a sub directory com and in that directory create a sub directory example and inside that directory place your Java class. Lastly right click on Right-click on the com.example package under the project name and select File/New File from the menu. In the dialogue that appears, click Advanced>>, tick the Link to file in the file system, then click on the Browse... button and browse to the plugin java source file, click Open and then Finish.
If everything went smoothly, there should be no compile errors indicated and you should be able to see that the automatic code suggestion/completion works, and you are ready to code!
But - a few things to note.
Eclipse will automatically compile your code, but EazyCNC does not use the Eclipse-compiled .class files[^3]. Instead, EazyCNC compiles the code on its own when it starts up and searches for plugins, cacheing the results in the EasyCNC/plugins-cached.
[^3]: You can make EazyCNC to use the Eclipse compiled files if you want. In this case you need to copy the .class files from the Eclipse projects output directory (usually bin or classes) to your plugin directory.
Also note that you can't just Run/Debug your code in Eclipse. To run the code, you need to start EazyCNC, which will then automatically pick up the code.
You can start EazyCNC any way you want or create an external run configuration for it in Eclipse.
Debugging Plugins
No programming task worth mentioning is going to work the first time around, so debugging is an integral part of the development process.
The easiest and safest way to debug is just to output debug information to the console.
The console can be viewed by pressing the F12 key when EazyCNC is running. This brings up a window inside EazyCNC where all the stuff output by the EazyCNC code and all the plugins appear. To hide the console, press F12 again.
To output things to the console, use the standard Java idiom:
System.out.println("Here comes the output");
or
System.out.printf("C-style printing!\n");
You can also use the standard System.err stream, in which case the output appears red in the console (instead of green).
If you start EazyCNC from the command line, you can also pass the argument -noconsole to EazyCNC on the command line. This will make all output appear in the terminal window from which you started the application.
To start the EazyCNC-application from the command line, type in your terminal the following:
java -jar EazyCNC.jar
Note that EazyCNC.jar is usually not available as the EazyCNC application is packed as a native executable for the operating system. If you want/need the EazyCNC.jar file, please contact sparetimelabs.com.
Attaching (or not!) a Debugger
Now, why did I say the safest way to debug is to output stuff to the console?
Because EazyCNC is (by necessity) a multithreaded real-time application which controls real world physical devices. If you attach a debugger to the code and set a break point, this will (a) not stop the whole program, only the single thread, while the rest of the code keeps ploughing on, nor will (b) the physical world magically stop; motors will continue running, the plasma torch will keep cutting and so on - only now out of control, because you've just stopped the program that manages them.
Having said that, it is possible to attach a debugger to EazyCNC using the Java remote debugging facility.
To attach the debugger, it is necessary to start EazyCNC from the command line with the following mouthful:
java -Xdebug -Xrunjdwp:transport=dt_socket,address=8000,server=y,suspend=y -jar EazyCNC.jar
Having launched EazyCNC with the above command, you can now attach your favourite debugger, be it the old rusty jdb or Eclipse's fancy GUI thingy.
Just google java remote debugging and you will find plenty of advice.
In Eclipse, meanwhile, you need to create a new debug configuration; go to Run/Debug Configurations... and under Remote Java Application create a new configuration. However, please remember that before you use the new configuration you need to first launch EazyCNC in debug mode as described above.
Anatomy of a Plugin
A plugin is any class of Java that extends the com.eazycnc.plugin.Plugin class.
The Plugin class defines a number of methods which you override to change or extend the functionality of EazyCNC.
Plugin loading process
When EazyCNC starts up it scans the plugins directory inside the EazyCNC home directory. The location of the home directory depends on your operating system as follows:
Mac OS X    '/Users/username'
Windows XP  'C:\Documents and Settings\username'
Windows 7   'C:\Users\username'
Linux       '/home/username'
EazyCNC scans every subdirectory of the plugins directory for .java source files. When it finds a java source file, it will next compare the file against the corresponding .class file (if one exists) in the Plugins-cached directory. If the source file is more recent or the cached class file does not exist, EazyCNC will compile the source file and place the resulting class file into the Plugins-cached directory.
Next, EazyCNC will scan every .jar file in the plugins directory as well as every subdirectory in the plugins directory for .class files.
Finally, the program checks every class encountered during the above scanning procedure to see if they extend the `com.eazycnc.plugin.Plugin' class. If a class does so, Eazy then creates an instance of that class and calls its onInit(). This is how a plugin comes to life.
The immediate subdirectory of the plugins directory containing a plugin is called the 'root' directory of that plugin.
Again, note that every time you make changes to a plugin, you need to restart EazyCNC for the changes to take effect.
Plugin naming
All directory, class and file names are case-sensitive, but you should really avoid having names that only differ in case, because not all file systems support this.
The name of the directory for your plugin does not matter, except that you'll probably want to use a name that will not clash with other plugins people will be writing. Also note that directories beginning with '.' will be ignored.
However, note that the directory and class/package names may show in error messages, so you might still want to pay some attention to naming and casing.
No two plugins should contain classes with identical names [^2]. To avoid clashes it is recommended that all plugins put their classes in a uniquely named package, for example by following the Java convention of using an author owned domain name as the package name.
[^2]: EazyCNC uses a separate class loader for each plugin, so actually class name collision will be resolved correctly and thus it is ok for two plugins to contain classes with identical names, which unavoidably happens if two plugins include the same library. However the UWT uses the names of the plugin classes find resources (graphics, translation dictionaries etc) and a name conflict may result in not finding the resources or finding incorrect resources.
You can change a name at any time, but please note that the storage of Plugin data (if you use this feature) is based on the plugin's root directory name, so changing its name will effectively wipe out anything a plugin has saved unless you re-name the corresponding data directory, too.
Writing Plugins
As mentioned above, every plugin derives from, or in Java parlance extends, the com.eazycnc.plugin.Plugin class. So a minimal but useless plugin (that does nothing but causes a few lines in the console output) would be:
import com.eazycnc.plugin.*;

public class MinimalPlugin extends Plugin {
    }
Most of the functionality your plugin provides is implemented by overriding one or more of the methods defined in the Plugin class.
Java version
EazyCNC is built on Java 8, so most Java 8 SE (Standard Edition) classes can be used in EazyCNC plugins as well.
However, any code that relies on the Swing toolkit will not work on Android [^Android]. For this purpose, for coding the user interface EazyCNC provides its own universal cross platform toolkit, which should be used instead of Swing.
Libraries
It is possible to include basically any pure Java library in your plugin. (And even native libraries can used with JNA.)
EazyCNC uses and makes available for plugins the following libraries:
| Library | Purpose | Interweb |
|---|---|---|
| JNA | Access to native libraries | github.com/twall/jna |
| PureJavaComm | Access to serial ports | github.com/nyholku/purejavacomm |
| PureJavaHidApi | Access to USB HID devices | github.com/nyholku/purejavahidapi |
To use them it is enough to simply import them, as they are in the class path for both the compiler and the plugin at run time.
EazyCNC of course uses a number of other libraries as well, but their usage is not supported, i.e. they may be removed in any future version of EazyCNC and thus cause any plugins that depend on them to fail.
[^Android]: In fact at the time of writing this compiling/developing plugins on Android is not supported and running plugins created on desktop OS will need to be converted to Java 6 classes before deployment on EazyCNC on Android.
A Word about Threads
Plugins can naturally use threads. If a plugin does not create a thread then most of its code (unless otherwise noted) will run in the so called Event Disptacher Thread (EDT).
There are two things to keep in mind in relation to EDT.
All of the user inteface code (screen updates, responding to buttons etc) runs in EDT so blocking this thread will cause the system to appear freezed, so all code in EDT should do what it needs to do as quickly as possible and then return.
Code that does not run in EDT but which needs to do interact with the user interface must delegate this to code running in the EDT. The UWT class provides a methodd scheduleInEDT() for this purpose, do not use the similar Swing based InvokeLater and friends.
Lastly, it is best to create threads as 'daemons' so that they will not prevent EazyCNC from exiting when the user says so.
Plugin lifecycle
After EazyCNC has loaded a plugin it calls the plugin's onInit() method. If there is some one-time initialisation you want to do, this is the place to do it.
Just before EazyCNC exits, the onExit() method of the plugin gets called, and this is the place to do whatever cleanup is necessary, like shutting down any hardware your plugin controls.
Saving plugin state
Some plugins need to 'remember' their state from one run of EazyCNC to another - things like name of a communication port, which port controls what and so on.
To facilitate this, EazyCNC calls the onSave(String filename) method of the plugin every time the user clicks the Save button. You need to override this method to implement saving the state.
When a plugin has been loaded and initialised, EazyCNC next calls the onLoad(String filename) method - this is where you need to read the previous saved state from the file. Note, however, that your onLoad method also needs to handle the case even when there is no previously saved state (because either it is the first time the plugin is executing or the user has never clicked the 'Save' button).
It is up to you how you maintain and save/load the state you want retained, but one easy way to do it is to use the Java Properties class, as in this example:
import com.eazycnc.plugin.*;

import java.util.*;
import java.io.*;


public class LoadSavePluginState extends Plugin {
    private Properties m_Properties = new Properties();

    @Override
    public void onLoad(String filename) throws Exception {
       try {
            m_Properties.load(new FileInputStream(filename));
        } catch(Exception e) {
            System.err.println("Failed to load properties from '"+filename+"'");
        }
    }

    @Override
    public void onSave(String filename) throws Exception {
        int saveCount=Integer.parseInt(m_Properties.getProperty("save_count","0"));
        m_Properties.setProperty("save_count",Integer.toString(saveCount+1));
        m_Properties.store(new FileOutputStream(filename),"Property list of an example plugin");
    }
}
The above example saves a counter, which counts the number of times the Save button has been clicked, in a file in the Plugins/plugin-data/ directory in the directory dedicated to your plugin. It does this by maintaining a dictionary of properties in the m_Properties member variable, which is easily saved and loaded into a text file.
Accessing EazyCNC functionality
Some plugins need to access basic EazyCNC functionality such as RUN, HOLD or STOP. Most of this functionality can be invoked through EazyCNC.EazyCNC.executeAction() method. To make it easier to call those methods, it is best to make a wholesale static import of that class, like this:
import static com.eazycnc.plugin.EazyCNC.*;
after which you can execute EazyCNC actions simply by their name, like this:
executeAction("RUN",true); // same as clicking the RUN-button
Some actions execute, once started, until stopped, there fore this methods takes a second parameter defining weather to start or stop the action.
For a list of available actions see the javadoc for EazyCNC.executeAction().
Writing User Interface code
The Universal Widget Kit
EazyCNC provides a toolkit, named Universal Widget Kit (UWT), for creating graphical user interfaces. This UI kit provides more or less the same widgets (buttons, checkboxes, entry fields etc.) as most other toolkits, such as Java's built-in Swing. The main difference is that UWK allows writing code that works in all the three major desktop operating systems, Mac OS X, Windows and Linux, and allows the same code to run on Android as well. Additionally, it goes further that most toolkits in how it helps to implement functionality behind the user interface elements.
To use the toolkit it is best to import all of it as follows:
import static com.eazycnc.uwt.UWT.*;
import com.eazycnc.uwt.*;
import com.eazycnc.uwt.widgets.*;
and while we are at it we might just as well import EazyCNC class to gain access to most of the EazyCNC functionality:
import static com.eazycnc.plugin.EazyCNC.*;
after which creating a push button is as simple as:
Button myButton = newButton("Click Me");
// above calls com.eazycnc.uwt.uwt.newButton
Note that all widget types are Java interfaces so you cannot create instances of them using Java new XXX operation. Instead you need to create them by calling the static newXXX methods in the UIKit class.
Custom Widget Graphics
Some widgets, such as buttons, you can customise by providing you own graphics as .png files.
You need to provide two version with names that adhere to the following convention. Suppose you want to call your graphics 'mybutton', you then need to provide two files named mybutton.png and mybutton_selected.png.
You need to save these files in a directory where one of your plugins classes (the .java) file resides.
Finally you need tell UWK where the files are, you do that by passing the afore mentioned class to the UWT by calling EazyCNC.setResourceLoaderClass().
Suppose your plugin is called MyPlugin and your plugin class is called com.mydomain.AwesomePlugin, the you save the graphics files into directory plugins/MyPlugin/com/mydomain/ inside the EazyCNC's home directory and you info UWT about them like this:
UWK.setResourceClass(com.mydomain.AwesomePlugin.class);
Or if you simply place all your stuff (plugin .java-files and resources etc) into one directory, make the above call from within the plugin class itself and did the imports as recommended above, you can simply do:
setResourceClass(this.getClass());
Note that you need to do this only once if you keep all your graphics in one directory.
Once UWK knows about your graphics you can create a button with your cool custom graphics simply like this:
Button my1stButton = newButton("mybutton", "Click Me");
It is also possible to use the EazyCNC built in graphics, for list of available graphics see the javadoc for UWK.newButton(String,String).
For example code like this:
Button my3rdtButton = newButton("button_red", "Click Me Too");
creates a button that looks like this:

Layouts and laying out widgets
The user interface is made of widgets arranged into layouts. Layouts can be nested, but usually you are better off not nesting them. Typically, you create just one layout by instantiating a class Layout (from the package com.eazycnc.widgets) and adding components to it.
The components are arranged into a grid-like geometry according to the constraints you provide when you add them. This allows the very easy and mostly intuitive creation of professional-looking layouts with minimal coding. The magic is performed under the hood by a layout engine called MigLayout.
To learn everything about layouts, constraints and MigLayout, go to:
MigLayout is a very popular layout engine, so examples are easy to google and Stack Overflow provide a lot of answers, too.
Variables
Before we go deeper into widgets, however, a few lines on Variables. These are not you granddad's ints and booleans, but instances of the class (well, interface, really) ’Variable’.
Variables are an integral part of how the user interface widgets interact with both each other and the rest of the application. If you are familiar with the Model Control View programming pattern, think of them as part of the Model, with the widgets carrying out the roles of Control and View.
Basically, Variables are just what the name says - variables that store some data. The type of data can be anything, but mostly it is just 'primitive', plain old ints,floats,strings and booleans.
The main reason for the existence of Variables is to allow widgets to attach Observers (an other pattern) to them so that when one widget (or anything, really) changes, the other widgets attached to the variable are notified.
For example, if you attach an entry field to a variable, then any other entry field attached to it will display and track the same value when the user enters a number into any of the attached entry fields.
Or you can attach an observer to a variable that will enable/disable an entry field and use checkbox to control that variable.
The second reason for the existence of Variables is to allow the attaching of additional information to the data, such as minimum and maximum values or other means of validating user input.
When the user attempts to change the value of a variable, the widget consults the variable to ascertain that the value is acceptable and rejects invalid values with the appropriate error indication if it isn't.
There is more than this to Variables, of course, but at this point it is enough to just introduce the concept.
In practice, most Variables are instances of the classes SimpleVariable and NumericVariable in the package com.eazycnc.uwt.
When you create a variable, you pass it an initial value and, if you wish, the limits of the value. The following example creates a numeric variable with the initial value of 1 and a valid range of values between 0 and 100 inclusive.
Variable myFirstVariable = new NumericVariable(1, 0, 100);
Widgets and Variables at play
To demonstrate how widgets and Variables play together, consider the following code:
        Layout layout = newTitledLayout("My Stuff");

        Variable variable = new NumericVariable(1, 0, 10);

        layout.add(newLabel("Presets:"), "align right");
        layout.add(newComboBox(variable, "A", 1, "B", 2), "wrap");

        layout.add(newLabel("Value:"), "align right");
        layout.add(newTextField(variable, 16.0, 8),"wrap");
        Button button = newButton("Clear");
        layout.add(button,"skip");

        button.addActionListener(() -> variable.setValue(0));
which creates following user interface:
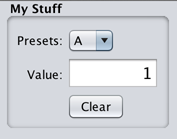
Notice how easily the widgets are added to the layout, line by line, left to right, with just a few constraints thrown in.
If you try the above code, you will see how selecting A or B from the combobox sets the value of the variable to one or two respectively, which is reflected in the entry field. If you type in a value in the entry field, the combobox will change to reflect that. Clicking on the Clear button will set the variable to zero, which is again reflected both in the entry field and the combobox.
If you try to enter an out-of-range (0..10) value in the entry box, you'll get an error message and the original value is restored.
All this with just a few lines of code.
Examples
Complete worked out examples are available for downloading from plugin.zip.
These example should compile and run but the functionality in many of them has not been tested, especially functionality that deals with real hardware.
You can try them out by copying the unzipped plugins folder to your EazyCNC home folder. Note that some of the examples do not work out of the box (but do no harm),
rather they are intended as starting points for experimenting.
Following table briefly lists the plugins and the features they demonstrate:
| Plugin | Demonstrates |
|---|---|
| myfirstplugin | Hello World - plugin, the simplest of them all |
| coolantplugin | Accessing native DLL and hardware (parallel port) with JNA |
| customview(1) | Customising User interface by adding a set up view, buttons with custom graphics |
| gcodeextension | Adding new G-codes to EazyCNC |
| loadsavestate | Saving and loading of plugins state, for example set up information (persistence if like fancy words) |
| pendantplugin | Accessing USB HID devices with PureJavaHIDAPI and creating a CNC -Pendant |
| spindleplugin | Accessing a VFD (Variable Frequency Drive) -unit via serial port using PureJavaComm |
| toolrenderer | Creating a custom OpenGL based renderer to display a ball nosed tool in the 3D Toolpath View |
| widgetandvariables(1) | Laying out widgets with MigLayout and connecting them to Variables to implement some settings the user can change |
(1) these two plugins are mutually exclusive because they both add a custom view, so only one of them should be used
The following chapters are based on above listed example code and give more insight into the example code. You should study them side by side.
Customising EazyCNC User Interface
[See widgetandvariables and customview -plugins]
Now that we know the basics of creating a user interface, let's see about customising the actual EazyCNC user interface.
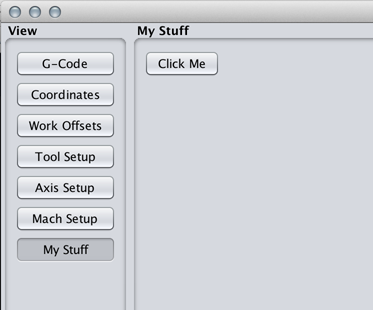
For illustration, the below code will add a new 'view' to the top half of the EazyCNC window. The view could be e.g. one where additional setup information would be entered for a plugin, such as USB I/O port configuration, or... anything, really.
For the purposes of simplicity, however, this view will contain just one button, the clicking of which will output a message to the console.
Now, to add this view, we need to override the onCreateViewButtons method. This method has two arguments; (1) a special stack layout object, like a stack of cards in which only one card is visible at a given time, and (2) a variable which holds a string controlling which of the cards is visible.
EazyCNC calls this method to create the view control buttons in the top left corner of the screen. Because we do not want to lose any existing functionality, we will now need to create buttons that will bring up the 'standard' views. The 'stack of cards' already has all the views, however, so all we need to do is to create buttons that set the view control variable to the appropriate names for the corresponding views. If we wanted to hide a standard view, we would simply not add a button for it in this method.
After we have created the standard buttons, we create our own view complete with the 'Click Me' button, and, giving it a name, add the view to the stack.
Finally, we add to the view control view a button that will set the view control variable to the name of our view.
See the following code, it is pretty straightforward:
public class CustomViewPlugin extends Plugin {

    @Override
    public Layout onCreateViewButtons(Variable viewVar, CardLayout viewStack) {

        Layout layout = newTitledLayout("View", "flowy,fillx");

        layout.add(newToggleButton(viewVar, "G-Code", "g-code-view"), "growx");
        layout.add(newToggleButton(viewVar, "Coordinates", "coordinates-view"), "growx");
        layout.add(newToggleButton(viewVar, "Work Offsets", "work-offsets-view"), "growx");
        layout.add(newToggleButton(viewVar, "Tool Setup", "tool-setup-view"), "growx");
        layout.add(newToggleButton(viewVar, "Axis Setup", "axis-setup-view"), "growx");
        layout.add(newToggleButton(viewVar, "Mach Setup", "mach-setup-view"), "growx");

        Layout myView = newTitledLayout("My Stuff");
        viewStack.addCard("my-view", myView);

        Button my1stButton = newButton("Click Me");
        myView.add(my1stButton);
        my1stButton.addActionListener(() ->System.out.println("Button Clicked!"));

        layout.add(newToggleButton(viewVar, "My Stuff", "my-view"), "growx");

        return layout;
        }
}
and here is the resulting, customised, EazyCNC user interface:
Using the variables and entry fields with the saving and loading of the plugin state we learned about earlier, we could easily expand this to a complete set-up view for our plugin.
The Plugin class contains a dozen or so onCreateXxxView methods, which you can override to customise most of the EazyCNC user interface. Look up the javadoc for details.
Implementing a custom spindle controller
[See spindleplugin-plugin]
In the following, we will be sketching out an imaginary Variable Frequency Driver (VFD) controller interface plugin that uses a serial port to talk to a VFD controlling a spindle motor.
To implement a spindle controller it is enough to override the onUpdateSpindle method. In this method we will send commands to our imaginary VFD using a serial port.
But before we can use the serial port, we need to open it. This needs to be done by overriding the setConnectionState method. In this method, we will try to open the port. EazyCNC will keep on calling the setConnectionState as long as the connection state does not match the requested state. This makes the system automatically retry the connection until it succeeds without any user intervention, which is essential for a good user experience.
In the plugin we provide the following method:
public class SpindlePlugin extends Plugin {

    private SerialPort m_CommPort;
    private String m_PrevCmd;
    private PrintStream m_Output;

    @Override
    public void setConnectionState(ConnectionState status) {
        if (status == ConnectionState.CONNECTED) {
            try {
                m_CommPort = (SerialPort) CommPortIdentifier.getPortIdentifier("COM").open("", 1);
                m_Output = new PrintStream(m_CommPort.getOutputStream());
                m_PrevCmd = null;
            } catch (NoSuchPortException e) {
                status = getConnectionState().DEVICE_NOT_FOUND;
            } catch (PortInUseException e) {
                status = getConnectionState().DEVICE_BUSY;
            } catch (IOException e) {
                status = getConnectionState().DEVICE_NOT_RESPONDING;
            }
        } else {
            if (m_CommPort != null) {
                m_CommPort.close();
                m_CommPort = null;
            }
        }
        super.setConnectionState(status);
    }
In the override for onUpdateSpindle, we check if the port is open and send (our imaginary) commands to the VFD through the port. Because this method can be called hundreds of times per second and the serial communication may be slow, we send a new command to the VFD only if the command actually changes. In real life, this is not the safest strategy; a much better one would be to send the command anyway at some max. number of times per second to ensure that even when there is a glitch somewhere, the correct values eventually get updated. However, I wanted to keep the example simple, so the code for this method now looks like this:
    @Override
    public boolean onUpdateSpindle(boolean spindleOn, boolean forward, int speed) {
        if (m_CommPort == null) {
            String cmd = "";
            if (spindleOn)
                cmd = "S-ON";
            else
                cmd = "S-OFF";
            if (forward)
                cmd += " FWD";
            else
                cmd += " REV";
            cmd += " SPEED " + speed;
            if (!cmd.equals(m_PrevCmd)) {
                m_Output.println(cmd);
                m_PrevCmd = cmd;
            }

        }
        return true;
    }
And that concludes this imaginary spindle control plugin. You can similarly override the onUpdateCoolant method to create a custom coolant controller.
As an aside, note that the onUpdateSpindle return a boolean (true or false) to indicate weather this method replaces the built in spindle control system or merely piggybacks on it. If this method returns true it means that it completely replaces the built in system. If it returned false then the built in spindle control would still function in addition whatever the plugin provides.
Creating a Pendant plugin
[See pendantplugin-plugin]
In CNC parlance a Pendant is a handheld remote control device used to control the CNC machine.
The easiest way to attach one to EazyCNC is via the USB interface. And by far the easiest USB device class to use for this is HID (Human Interface Device), which requires no drivers and readily accessible from EazyCNC using PureJavaHIDAPI.
Following shows how to scan (look for) a HID device in a plugin:
import java.util.List;

import purejavahidapi.*;

import com.eazycnc.plugin.*;

// Note, none of this has been actually tested!

public class PendantPlugin extends Plugin {
    private HidDevice m_PendantDevice;
    @Override
    public void setConnectionState(ConnectionState status) {
        // we want the pendant to work both in MACH and SIMU modes, don't we
        if (status == ConnectionState.CONNECTED || status == ConnectionState.SIMULATION) {
            if (m_PendantDevice != null) { // if it was open we close before we try to re-open it
                m_PendantDevice.close();
                m_PendantDevice = null;
                m_PrevMessage = null;
            }
            try {
                List<HidDeviceInfo> devList = PureJavaHidApi.enumerateDevices();
                HidDeviceInfo devInfo = null;
                for (HidDeviceInfo info : devList) {
                    if (info.getVendorId() == (short) PENDANT_VID && info.getProductId() == (short) PENDANT_PID) {
                        devInfo = info;
                        break;
                    }
                }
                if (devInfo != null) {
                    m_PendantDevice = PureJavaHidApi.openDevice(devInfo.getPath());
                    m_PendantDevice.setInputReportListener(new InputReportListener() {
                        @Override
                        public void onInputReport(HidDevice source, byte Id, byte[] data, int len) {
                            handlePendantMessage(len, data);
                        }
                    });

                } else
                    status = ConnectionState.DEVICE_NOT_FOUND;
            } catch (Exception e) {
                status = ConnectionState.SHUTDOWN;
                e.printStackTrace();
            }
        } else {
            if (m_PendantDevice != null) {
                m_PendantDevice.close();
                m_PendantDevice = null;
                m_PrevMessage = null;
            }

        }
        super.setConnectionState(status);
    }
Above scans for the device and if found attaches a message handler. (Message in HID parlance are called 'reports' which is just a fancy way to name small chuck of bytes coming from the device.)
Message handling of course totally depends on the pendant and its message format, but following sketches one (imaginary) way of handling the messages:
...
    final private int RUN_BUTTON_INDEX = 7;
    final private int RUN_BUTTON_MASK = 0x80;
...
    private HidDevice m_PendantDevice;

    private byte[] m_PrevMessage;
    private byte[] m_LastMessage;
    private byte[] m_ChangedBits;
...
    private boolean checkBit(int index, int mask, boolean checkForChange, boolean checkForSet) {
        if (checkForChange && (m_ChangedBits[index] & mask) == 0)
            return false; // had not changed
        return ((m_LastMessage[index] & mask) != 0) == checkForSet;
    }

    private void handlePendantMessage(int len, byte[] message) {
        if (m_PrevMessage == null) {
            // if we do not have previous message, the create a copy
            // of current message but every bit flipped so they will
            // be interpreted as changed the first time around
            m_ChangedBits = new byte[message.length];
            m_PrevMessage = new byte[message.length];
            m_LastMessage = new byte[message.length];
            for (int i = 0; i < message.length; i++)
                m_PrevMessage[i] = (byte) (message[i] ^ 0xFF);
        }

        // make a copy of the message, that is safer
        System.arraycopy(message, 0, m_LastMessage, 0, message.length);

        // find out which bits have changed
        for (int i = 0; i < message.length; i++)
            m_ChangedBits[i] = (byte) (m_PrevMessage[i] ^ m_LastMessage[i]);


        if (checkBit(RUN_BUTTON_INDEX, RUN_BUTTON_MASK, true, true)) { // RUN-button status has changed and is now set
            EazyCNC.executeAction("RUN", true); // execute the RUN-function
        }
    }
Implementing a custom tool path rendering
[See toolrenderer-plugin]
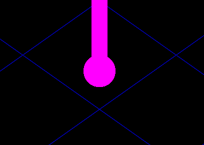
The standard way EazyCNC represents the tool and tool-path is by rendering a pink cylinder for the tool and a red/green polygon 'line' for the tool-path. This works fine for many applications, but is not ideal for complex three-dimensional surfaces, nor does it support four or more axis machining in any meaningful way.
Fortunately, you can change all that by creating a plugin that creates a custom renderer.
To do that, you need to override the onCreateToolRenderer method and return an instance of the class ToolRenderer (in the package com.eazycnc.toolpathrenderer) which will do the rendering.
Rendering is based on a subset of OpenGL ES 2.0 found in the com.eazycnc.opengl.GL class. The raison d'être for this and other OpenGL classes is to provide a true cross-platform API that requires no code changes to run on both Android and desktop operating systems.
The 'syntax and semantics' are compatible with OpenGL ES 2.0, but not all features are implemented at this time.
The following code creates a renderer that represents a ball-nosed tool:
import com.eazycnc.plugin.*;
import com.eazycnc.toolpathrenderer.ToolRenderer;
import com.eazycnc.opengl.*;
import static com.eazycnc.plugin.EazyCNC.*;

public class ToolRendererPlugin extends Plugin {

    @Override
    public ToolRenderer onCreateToolRenderer() {
        return new ToolRenderer() {
            GLShape m_ToolShaft;
            GLShape m_ToolEnd;
            double m_ToolRadius;

            public void renderTool(GL gl, double[] axisPositions) {

                gl.glEnable(GL.GL_COLOR_MATERIAL);
                gl.glColor3f(1, 0, 1);

                gl.glPushMatrix();
                gl.glTranslatef((float) axisPositions[0], (float) axisPositions[1], (float) axisPositions[2]); // Center The Cylinder

                float r = (float) Math.abs(getParamDouble(RADIUS_COMPENSATION));

                int toolNo = getParamInt(CURRENT_TOOL);
                if (r == 0 && toolNo > 0)
                    r = (float) (getToolSpec(toolNo).getRadius());
                if (r < 1)
                    r = 1;

                if (m_ToolShaft == null || m_ToolRadius != r) {

                    int axisNo = 2;
                    int bi = MOTOR_CONFIG_BASE + MOTOR_CONFIG_STRIDE * axisNo;
                    float min = (float) getParamDouble(bi + MOTOR_LIMIT_MIN_OFFSET);
                    float max = (float) getParamDouble(bi + MOTOR_LIMIT_MAX_OFFSET);

                    m_ToolShaft = GLShape.createCylinder(r/2, r/2, (max-min), 16, 1);
                    m_ToolEnd = GLShape.createSphere(r, 16,16);
                }
                m_ToolRadius = r;

                m_ToolShaft.render(gl);

                gl.glTranslatef(0, 0, 0);
                m_ToolEnd.render(gl);

                gl.glPopMatrix();

            }

            public void onOpenGlSurfaceChanged() {

            }

        };
    }
}
The above creates a tool rendering that looks like this:
To create a custom renderer for the tool-path, you need to override the onCreateToolpathRenderer and return an instance of ToolpathRenderer to do the job. The interface for the tool-path renderer is deceptively simple:
public interface ToolpathRenderer {
    public void resetToolPath(boolean spindleOn);
    public void concatToolMove(boolean cut,boolean spindleOn, double radius, double[] axispos);
    public void renderToolPath(boolean plan, GL gl, Vector3f zo);
    public void onOpenGlSurfaceChanged();
}
However, the actual code to implement this in any useful way will be pretty long and complex, and describing it would thus neither fit nor fit in this manual very well. The reason for the complexity is that the tool-path can be very long and yet needs to be rendered tens of times per second. To do that, the actual path needs to be cached in OpenGL Vertex Buffer Objects and managed efficiently and with thread safety in mind, which is not an easy task. If you'd like to do that, please contact SpareTimeLabs for assistance and some example code.
Extending G-codes
[See gcodeextension-plugin]
EazyCNC supports a large set of G and M codes, but by no means every G/M code out there.
If you want to support e.g. the M6 tool change with a real tool changer, you can do that by writing a G-code compiler extension.
EazyCNC processes G-codes in two phases.
First, it scans through the complete G-code file and compiles the code into an internal representation that has most of the time-consuming stuff already pre-calculated. This compilation is done before the actual machining starts so there are no time constraints; the somewhat complex tool radius compensation, for example, is done in this stage.
Then at machining time the pre-compiled tool path is converted into actual motor controller movements and I/O commands for the spindle and coolant and whatnot.
Thus any G-code extension needs to hook to both of these phases and have access to the pre-parsed G-code to play ball with the rest of the G-codes and their interpretation.
To create a G-code extension you need to override the onCreateGCodeCompilerExtension method and return an instance of GCodeCompilerExtension (from the package com.eazycnc.gcode). Note that unlike with most other Plugin methods, it is acceptable for more than one plugin to override this method as it is feasible that different plugins could provide support for different G-codes.
The compiler extension needs to implement a single processGcodes method that can then process any G-codes you want. The processGcodes method is called once for each line of the G-code file in the pre-compile phase. The method gets a crack at the line before any built in G-code processing takes place, so a compiler extension can actually process and consume those G-codes that EazyCNC would ordinarily process as well.
The processGcodes method gets a handle to the GCodeCompiler object from which it can query the pre-parsed G-code line.
For example, this is how a compiler extension checks if the line being compiled contains the M6 code:
if (compiler.getMCode(6))
Note that calling getMCode or getGCode for any code also consumes that code, so EazyCNC will not process that code.
Access to axis words and other words is provided by the GCodeCompiler.getWordValue method. Access to the machine state/parameters is additionally provided. For details, see the javadoc.
Once the compiler extension has found a G-code it wants to process, it does what needs to be done and submits a callback object to be run at machining time when the corresponding G-code line is executed. It does this by creating an instance of com.eazycnc.gcode.Callback and calling addMachCode on the compiler object to insert that callback to EazyCNC's internal pre-processed tool-path.
To put this into concrete terms, here is a complete plugin that processes M6 codes and emits a message to the console at machining time every time an M6 is encountered:
import com.eazycnc.plugin.*;
import com.eazycnc.gcode.*;

public class GCodeExtensionPlugin extends Plugin {
    @Override
    public GCodeCompilerExtension onCreateGCodeCompilerExtension() {
        return new GCodeCompilerExtension() {
            public void processGcodes(GCodeCompiler compiler) {
                if (compiler.getMCode(6))
                    compiler.addMachCode(() -> System.out.println("EXECUTING M6"));
            }
        };
    }
Notice what a short job the Java 8 Lambda expression makes from creating the callback object!
Implementing a custom motor controller
[no plugin yet demonstrates this]
The motor controller is the part of EazyCNC that implements the low level motor controller at the level of movements, which are specified in steps.
EazyCNC does not implement step-level control of motors because Java is not suitable for implementing microsecond-level control of hardware. Instead, EazyCNC outsources step generation to the TOAD4 controller board. Naturally, TOAD4 is not suitable for every application for various reasons. By implementing a custom motor controller it is possible to interface EazyCNC with other motor controllers, or even special real-time drivers that can do the hard microsecond-level step generation.
To implement a custom motor controller, you need to override the onCreateMotorController method and return a class that implements the MotorController interface in the package com.eazycnc.motorcontroller.
Like all other hardware-related plugins, the motor controller should establish the connection with the actual hardware in the setConnectionState method. Note also that, one way or the other, you need to support the simulated connection state as well.
The main task of the motor controller is to receive movement commands from the EazyCNC movement planner and forward them as fast as possible to the actual hardware. This happens in the queueMove method, which needs to block (not return) until it can forward the movement command. This method gets called on average at the motor update rate, which the user can configure in the Mach Setup/Movement panel.
But there is of course a lot more than this to developing a motor controller. Please see the javadoc for details and don't hesitate to contact SpareTimeLabs for assistance.